
前言
正文
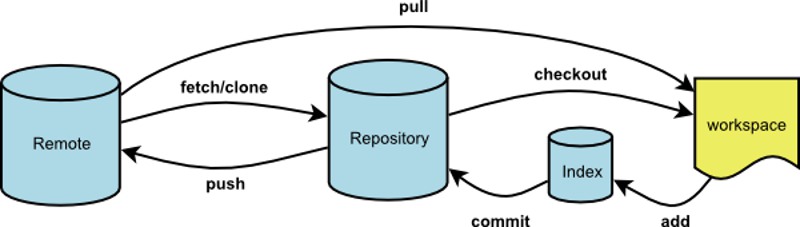
工作协同
- 参与GitHub中的项目开发,最常用和推荐的首选方式是“Fork + Pull”模式。
在派生项目中创建的提交,可以非常方便地利用GitHub的Pull Request工具向原始项目的维护者发送Pull Request。
建立主页:GitHub用户通过创建特殊名称的Git版本库或在Git库中建立特别的分支实现对主页的维护
- 创建个人主页:GitHub 为每一个用户分配了一个二级域名
.github.io, 例如我自己的site: https://zhangkn.github.io
1、托管空间下创建一个名为<user-id>.github.io的版本库,向其master分支提交网站静态页面即可,其中网站首页为index.html:https://github.com/zhangkn/zhangkn.github.io/blob/master/index.html
2、使用Jekyll维护网站
在Git库中建立特别的gh-pages分支实现对主页的维护。
<!-- 使用命令行创建干净的gh-pages分支:http://www.worldhello.net/gotgithub/03-project-hosting/050-homepage.html -->
<!-- Git底层命令:git symbolic-ref -->
devzkndeMacBook-Pro:AlipayWalletTweakF devzkn$ git symbolic-ref HEAD refs/heads/gh-pages

<!-- 删除暂存区文件,即相当于清空暂存区 -->
devzkndeMacBook-Pro:AlipayWalletTweakF devzkn$ rm .git/index

<!-- 创建主页文件  -->
devzkndeMacBook-Pro:AlipayWalletTweakF devzkn$ cp -R zhangkn.github.io/* .
git add .
devzkndeMacBook-Pro:AlipayWalletTweakF devzkn$ git commit -m "branch gh-pages init."
devzkndeMacBook-Pro:AlipayWalletTweakF devzkn$ git push -u origin gh-pages
- 使用专有域名:只要在master分支(用户主页所在版本库)或gh-pages分支(项目版本库)的根目录下检入一个名为CNAME的文件,内容为相应的专有域名。当然还要更改专有域名的域名解析,使得该专有域名的IP地址指向相应的GitHub二级域名的IP地址。
参考:http://www.worldhello.net/gotgithub/03-project-hosting/050-homepage.html
1、在账号gotgit的版本库gotgit.github.io根目录下添加文件CNAME,文件内容为:www.worldhello.net。
2、然后更改域名www.worldhello.net的IP地址,指向域名gotgit.github.io对应的IP地址(注意不是github.com的IP地址)。

完成域名的DNS指向后,可试着用ping或dig命令确认域名www.worldhello.net和gotgit.github.io指向同一IP地址。
- 使用Jekyll维护网站:Jekyll是一个支持Textile、Markdown等标记语言的静态网站生成软件,还支持博客和网页模版,由Tom Preston-Werner(GitHub创始人之一)开发。Jekyll用Ruby语言实现,项目在GitHub的托管;专有的URL地址—-例子:site: https://zhangkn.github.io
GitHub为用户账号或项目提供主页服务,会从相应版本库的master分支或gh-pages分支检出网页文件,然后执行 Jekyll 相应的命令对网页进行编译。
因此在设计GitHub的用户主页和项目主页时都可以利用Jekyll,实现用Markdown等标记语言撰写网页及博客,并用页面模版实现网页风格的统一。

<!-- 安装Jekyll最简单的方法是通过RubyGems安装:会自动将Jekyll依赖的directory_watcher、liquid、open4、maruku和classifier等Gem包一并安装 -->
$ gem install jekyll
<!-- 显示软件版本 -->
$ jekyll -v
<!-- 目录结构 -->
1)非下划线(_)开头的文件(包括子目录中文件),如果包含YAML文件头,就会使用Jekyll进行编译,并将编译后的文件复制到目标文件夹(默认为_site目录)下。对于包含YAML文件头并用标记语言Markdown等撰写的文件,还会将编译后的文件以.html扩展名保存。而以下划线开头的文件和目录有的直接忽略不予处理(如_layouts、_site目录等),有的则需要特殊处理(如_post目录)。

2)目录_post用于保存博客条目,每个博客条目都以<YYYY>-<MM>-<DD>-<blog-tiltle>格式的文件名命名。扩展名为.md的为Markdown格式,扩展名为.textile的为Textile格式。这些文件都包含类似的文件头:
3)在根目录下还有一个配置文件_config.yml用于覆盖Jekyll的默认设置
hooks:版本库钩子扩展
- Services / Add Email 邮件通知功能:zhangkn.github.io/settings/hooks/new?service=email
 Branch: refs/heads/master
 Home:   https://github.com/zhangkn/zhangkn.github.io
 Commit: f74a9c7025159aa516827f37f35054a0a16bcd78
     https://github.com/zhangkn/zhangkn.github.io/commit/f74a9c7025159aa516827f37f35054a0a16bcd78
 Author: 张坤楠 <zhangkunnan@.com>
 Date:   2018-03-02 (Fri, 02 Mar 2018)

 Changed paths:
   M _posts/2018-03-02-BeyondFree.md
   M _posts/2018-03-02-GitHub.md

 Log Message:
 -----------
 Services
see also
向Jekyll博客的_posts /目录或者子目录提交了一个yyyy-mm-dd-title.md这样的文件

A client to post on a Jekyll blog: https://github.com/tsangiotis/JekyllForAndroid


The application uses the GitHub API.

<!-- allintext:Jekyll在_posts子目录 -->
https://github.com/hidva/hidva.github.io

https://github.com/hidva/hidva.github.io/tree/dev


_posts该目录下可以创建若干子目录.在 jekyll build 时会递归遍历 _posts 目录.


https://github.com/hidva/hidva.github.io/tree/dev/_posts/database/mysql 使用子目录的例子
<!-- Jekyll是用ruby语言实现的一个静态网站生成器 -->
1) Jekyll定义了一些内置的变量,包括全局变量、页面变量
2) Jekyll也可以通过插件来增加额外的功能
3) 关于Jekyll Bootstrap-- 是用Jekyll建立博客的一套模板,提供了主题(themes)、评论
# 使用Jekyll-Bootstrap,其实就是一个复制的过程。下面的USERNAME代表你在github上的用户名
git clone https://github.com/plusjade/jekyll-bootstrap.git USERNAME.github.com
4) Jekyll的目录结构
clearly/
├── _config.yml
├── _layouts
│ ├── default.html
│ └── post.html
├── _posts
│ └── 2013-05-29-welcome-to-jekyll.markdown
├── css
│ ├── main.css
│ └── syntax.css
└── index.html
- 其中,博客文章放在_posts目录中,可以使用子目录。---多么令人兴奋的事情,便于文章多的时候进场查询
- _layouts目录存放页面模板,其他还可以使用html、css、image等静态资源。
- Jekyll会把任何不以下划线开头的文件和目录都复制/生成到网站(在本地是生成到_site/目录)。
<!-- Markdown 语法说明 (简体中文版) / (点击查看快速入门): http://wowubuntu.com/markdown -->
http://wiki.shopify.com/Liquid
<!-- 关于github Pages -->
# 使用GitHub Pages的账户主页建立博客,必须使用如下形式的项目名称并使用主分支
# 如果使用项目主页,必须使用项目的gh-pages分支
github Pages是github提供的静态网页托管。可以为用户或者项目创建站点
github Pages对于上传的静态文件会通过Jekyll进行处理后再发布出来,为程序员量身定制的博客系统
1) 使用github Pages写博客的好处
自由,随意定制;方便,在github上托管;可控,有版本管理;直接,只需提交,不需要先导出再提交,让人愿意持续更新文章;
高效,使用markdown语言能提高写作的效率;免费,无限流量,无限空间
<!-- 二、进阶篇 -->
用原生的Jekyll来构建博客,让一切都在掌控之中;放弃Jekyll bootstrap
1)设计模板
jekyll把_layouts目录中的文档看做是模板,如果某个文档中的头部变量声明中指定了layout:
---
layout: default
---
- 则Jekyll在生成页面时会使用该模板进行渲染,用文档的内容替换模板中的<article class="post-container post-container--single" itemscope itemtype="https://schema.org/BlogPosting">
<link itemprop="mainEntityOfPage" href="https://zhangkn.github.io/archive/">
<header class="post-header" itemscope itemtype="https://schema.org/WPHeader">
<h1 itemprop="Headline" class="post-title">BeyondFree <!-- <div class="social-share"> -->
<ul class="share-buttons">
<li><a href="https://www.facebook.com/sharer/sharer.php?u=https%3A%2F%2Fzhangkn.github.io"e=" title="Share on Facebook" target="_blank" onclick="window.open('https://www.facebook.com/sharer/sharer.php?u=' + encodeURIComponent(document.URL) + '"e=' + encodeURIComponent(document.URL)); return false;"><img alt="Share on Facebook" src="/images/flat_web_icon_set/color/Facebook.png" /></a></li>
<li><a href="https://twitter.com/intent/tweet?source=https%3A%2F%2Fzhangkn.github.io&text=:%20https%3A%2F%2Fzhangkn.github.io&via=zhangkunnan" target="_blank" title="Tweet" onclick="window.open('https://twitter.com/intent/tweet?text=' + encodeURIComponent(document.title) + ':%20' + encodeURIComponent(document.URL)); return false;"><img alt="Tweet" src="/images/flat_web_icon_set/color/Twitter.png" /></a></li>
<li><a href="https://plus.google.com/share?url=https%3A%2F%2Fzhangkn.github.io" target="_blank" title="Share on Google+" onclick="window.open('https://plus.google.com/share?url=' + encodeURIComponent(document.URL)); return false;"><img alt="Share on Google+" src="/images/flat_web_icon_set/color/Google+.png" /></a></li>
<li><a href="http://www.linkedin.com/shareArticle?mini=true&url=https%3A%2F%2Fzhangkn.github.io&title=&summary=&source=https%3A%2F%2Fzhangkn.github.io" target="_blank" title="Share on LinkedIn" onclick="window.open('http://www.linkedin.com/shareArticle?mini=true&url=' + encodeURIComponent(document.URL) + '&title=' + encodeURIComponent(document.title)); return false;"><img alt="Share on LinkedIn" src="/images/flat_web_icon_set/color/LinkedIn.png" /></a></li>
<li><a href="mailto:zhang_kn@icloud.com?subject=&body=:%20https%3A%2F%2Fzhangkn.github.io" target="_blank" title="Send email" onclick="window.open('mailto:zhang_kn@icloud.com?subject=' + encodeURIComponent(document.title) + '&body=' + encodeURIComponent(document.URL)); return false;"><img alt="Send email" src="/images/flat_web_icon_set/color/Email.png" /></a></li>
<!--<wb:share-button appkey="3233061066" addition="simple" type="button" ralateUid="2939794294"></wb:share-button>-->
</ul>
<!-- </div> -->
</h1>
<div class="post-meta">
<img src="/images/calendar.png" width="20px"/>
<time datetime="2018-03-02 00:00:00 +0000" itemprop="datePublished" class="post-meta__date date">2018-03-02</time>
<span id="busuanzi_container_page_pv"> | 阅读:<span id="busuanzi_value_page_pv"></span>次</span>
</p>
</div>
</header>
<section class="post" itemscope itemtype="https://schema.org/BlogPosting" >
<h3 id="前言">前言</h3>
<blockquote>
<ul>
<li>最近在得到订阅了 《吴军的谷歌方法论》,很喜欢其中的一句话
<div class="language-plaintext highlighter-rouge"><div class="highlight"><pre class="highlight"><code>“不错,半农确是浅。但他的浅,却如一条清溪澄澈见底,纵有多少沉渣和腐草,也不掩其大体的清。倘使装的是烂泥,一时就看不出它的深浅来了;如果是烂泥的深渊呢,那就不如浅一点的好”
</code></pre></div> </div>
</li>
<li>超越免费的6个锦囊
<div class="language-plaintext highlighter-rouge"><div class="highlight"><pre class="highlight"><code>第一条就是强化稀缺性、第二条是通过时效性超越免费、
第三条是个性化、第四条是提供可用性(易理解性)的产品和服务、第五条是提供可靠而易用的服务、第六条是提供具有数据黏性的服务
</code></pre></div> </div>
</li>
</ul>
</blockquote>
<h3 id="正文">正文</h3>
<blockquote>
<ul>
<li>强化稀缺性
<div class="language-plaintext highlighter-rouge"><div class="highlight"><pre class="highlight"><code>超越免费的第一条是制造一种稀缺性,而这需要产品、服务、技能本身具有一种难以复制的特性
</code></pre></div> </div>
</li>
</ul>
</blockquote>
<blockquote>
<ul>
<li>通过时效性超越免费-
<div class="language-plaintext highlighter-rouge"><div class="highlight"><pre class="highlight"><code>终身学习-了解了时效性,你可能也体会了终身学习的重要性,因为这样总是可以领先同辈人一步,让自己成为具有时效性的人才,而不是廉价的人。
</code></pre></div> </div>
</li>
</ul>
</blockquote>
<blockquote>
<ul>
<li>个性化
<div class="language-plaintext highlighter-rouge"><div class="highlight"><pre class="highlight"><code>一直强调,要做一个有趣的人,这个有趣,就是个性化。每一个人只有成为了有趣的人,有大家所喜欢的个性的人,大家才能喜欢你。---个性化医疗
</code></pre></div> </div>
</li>
<li>提供可用性(易理解性)的产品和服务
<div class="language-plaintext highlighter-rouge"><div class="highlight"><pre class="highlight"><code>在任何时代能够把事情解释清楚不仅是一个有用的本领,而且是一个很赚钱的生意。---例如得到的每天听一本书
</code></pre></div> </div>
</li>
</ul>
</blockquote>
<blockquote>
<ul>
<li>提供可靠而易用的服务
<div class="language-plaintext highlighter-rouge"><div class="highlight"><pre class="highlight"><code></code></pre></div> </div>
</li>
<li>提供具有数据黏性的服务
<div class="language-plaintext highlighter-rouge"><div class="highlight"><pre class="highlight"><code>讲师-听众
</code></pre></div> </div>
</li>
</ul>
</blockquote>
<h3 id="see-also">see also</h3>
<ul>
<li><a href="https://baike.baidu.com/item/%E8%BE%B9%E9%99%85%E6%88%90%E6%9C%AC">边际成本:边际成本指的是每一单位新增生产的产品(或者购买的产品)带来的总成本的增量</a></li>
<li><a href="https://sites.google.com/view/zhangkn/%E9%A6%96%E9%A1%B5">Google 协作平台 https://sites.google.com/new?usp=jotspot_si</a></li>
<li><a href="https://search.google.com/search-console?resource_id=https://zhangkn.github.io/&utm_source=wnc_20050170&utm_medium=gamma&utm_campaign=wnc_20050170&utm_content=msg_110105790&hl=zh-CN">新版的search-console</a></li>
</ul>
<!-- 转载声明的封装-->
<p itemprop="publisher">
转载请注明:<a itemprop="author" target="_blank" href='https://zhangkn.github.io'>张坤楠的博客</a> > <a target="_blank" href='/2018/03/BeyondFree/'>BeyondFree</a>
</p>
<p>
在操作过程或者文章有问题的话欢迎在 <a target="_blank" href='/2018/03/BeyondFree/'>原文</a> 里提问或指正。
</p>
</section>
</article>
<section>
<div class="content-play">
<p><a href="javascript:void(0)" onclick="dashangToggle()" class="dashang" title="打赏,支持一下">赞赏支持</a></p>
<div class="hide_box-play"></div>
<div class="shang_box-play">
<a class="shang_close-play" href="javascript:void(0)" onclick="dashangToggle()" title="关闭"><img src="/images/payimg/close.jpg" alt="取消" /></a>
<div class="shang_tit-play">
<p>感谢您的支持,我会继续努力的!</p>
</div>
<div class="shang_payimg">
<img src="/images/payimg/alipayimg.jpg" alt="扫码支持" title="扫一扫" />
</div>
<div class="shang_payimg">
<img src="/images/payimg/weipayimg.jpg" alt="扫码支持" title="扫一扫" />
</div>
<div class="pay_explain">扫码打赏,你说多少就多少</div>
<div class="shang_payselect">
<div class="pay_item checked" data-id="alipay">
<span class="pay_logo"><img src="/images/payimg/alipay.jpg" alt="支付宝" /></span>
</div>
<div class="pay_item" data-id="weipay">
<span class="pay_logo"><img src="/images/payimg/wechat.jpg" alt="微信" /></span>
</div>
</div>
</div>
</div>
<script type="text/javascript">
function dashangToggle(){
$(".hide_box-play").fadeToggle();
$(".shang_box-play").fadeToggle();
}
</script>
<div style="text-align:center;margin:50px 0; font:normal 14px/24px 'MicroSoft YaHei';"></div>
<style type="text/css">
.content-play{width:80%;margin-top: 20px;margin-bottom: 10px;height:40px;}
.hide_box-play{z-index:999;filter:alpha(opacity=50);background:#666;opacity: 0.5;-moz-opacity: 0.5;left:0;top:0;height:99%;width:100%;position:fixed;display:none;}
.shang_box-play{width:540px;height:540px;padding:10px;background-color:#fff;border-radius:10px;position:fixed;z-index:1000;left:50%;top:50%;margin-left:-280px;margin-top:-280px;border:1px dotted #dedede;display:none;}
.shang_box-play img{border:none;border-width:0;}
.dashang{display:block;width:100px;margin:5px auto;height:25px;line-height:25px;padding:10px;background-color:#E74851;color:#fff;text-align:center;text-decoration:none;border-radius:10px;font-weight:bold;font-size:16px;transition: all 0.3s;}
.dashang:hover{opacity:0.8;padding:15px;font-size:18px;}
.shang_close-play{float:right;display:inline-block;
margin-right: 10px;margin-top: 20px;
}
.shang_logo{display:block;text-align:center;margin:20px auto;}
.shang_tit-play{width: 100%;height: 75px;text-align: center;line-height: 66px;color: #a3a3a3;font-size: 16px;background: url('/images/payimg/cy-reward-title-bg.jpg');font-family: 'Microsoft YaHei';margin-top: 7px;margin-right:2px;}
.shang_tit-play p{color:#a3a3a3;text-align:center;font-size:16px;}
.shang_payimg{width:140px;padding:10px;padding-left: 80px; /*border:6px solid #EA5F00;**/margin:0 auto;border-radius:3px;height:140px;display:inline-block;}
.shang_payimg img{display:inline-block;margin-right:10px;float:left;text-align:center;width:140px;height:140px; }
.pay_explain{text-align:center;margin:10px auto;font-size:12px;color:#545454;}
.shang_payselect{text-align:center;margin:0 auto;margin-top:40px;cursor:pointer;height:60px;width:500px;margin-left:110px;}
.shang_payselect .pay_item{display:inline-block;margin-right:140px;float:left;}
.shang_info-play{clear:both;}
.shang_info-play p,.shang_info-play a{color:#C3C3C3;text-align:center;font-size:12px;text-decoration:none;line-height:2em;}
</style>
<ul class="pager">
<li class="previous">
<a href="/2018/02/Electra/" data-toggle="tooltip" data-placement="top" title="Electra">上一篇: <span>Electra</span>
</a>
</li>
<li class="next">
<a href="/2018/03/GitHub/" data-toggle="tooltip" data-placement="top" title="GitHub">下一篇: <span>GitHub</span>
</a>
</li>
</ul>
</section>
<section class="post-comments">
<!-- http://www.uyan.cc/getcode-->
<div id="disqus_thread"></div>
<script>
var disqus_config = function () {
this.page.url = "https://zhangkn.github.io/2018/03/BeyondFree/";
this.page.identifier = "/2018/03/BeyondFree/";
};
var disqus_shortname = 'iosre';
(function() { // DON'T EDIT BELOW THIS LINE
var d = document, s = d.createElement('script');
s.src = '//' + disqus_shortname + '.disqus.com/embed.js';
s.setAttribute('data-timestamp', +new Date());
(d.head || d.body).appendChild(s);
})();
</script>
<noscript>要查看<a href="http://disqus.com/?ref_noscript"> Disqus </a>评论,请启用 JavaScript</noscript>
<!--<script id="dsq-count-scr" src="//iosre.disqus.com/count.js" async></script>-->
</section>
<section class="post-gitcomments">
<!-- http://www.uyan.cc/getcode-->
<div id="container"></div>
<link rel="stylesheet" href="https://imsun.github.io/gitment/style/default.css">
<script src="https://imsun.github.io/gitment/dist/gitment.browser.js"></script>
<script>
var gitment = new Gitment({
id: '/2018/03/BeyondFree/', // 可选。默认为 location.href
owner: 'zhangkn',
repo: 'githubpages-comments',
oauth: {
client_id: 'eb8baa6afd018fb78abf',
client_secret: 'c7b3a1a69585b929f76b9b849a5266c6198d8498',
},
})
gitment.render('container')
</script>
</section>
<section class="read-more">
<div class="read-more-item">
<span class="read-more-item-dim">最近的文章</span>
<h2 class="post-list__post-title post-title"><a href="/2018/03/GitHub/" title="link to GitHub">GitHub</a></h2>
<p class="excerpt">前言正文工作协同 参与GitHub中的项目开发,最常用和推荐的首选方式是“Fork + Pull”模式。 在派生项目中创建的提交,可以非常方便地利用GitHub的Pull Request工具向原始项目的维护者发送Pull Request。 建立主页:GitHub用户通过创建特殊名称的Git版本库或在Git库中建立特别的分支实现对主页的维护 创建个人主页:GitHub 为每一个用户分配了一个二级域名.github.io, 例如我自己的sit...…</p>
<div class="post-list__meta"><time datetime="2018-03-02 00:00:00 +0000" class="post-list__meta--date date">2018-03-02</time> • <span class="post-list__meta--tags tags">tool</span><a class="btn-border-small" href=/2018/03/GitHub/>继续阅读</a></div>
</div>
<div class="read-more-item">
<span class="read-more-item-dim">更早的文章</span>
<h2 class="post-list__post-title post-title"><a href="/2018/02/Electra/" title="link to Electra">Electra</a></h2>
<p class="excerpt">前言本文的重点是定制一些自己的功能 Electra iOS 11.0 - 11.1.2 jailbreak toolkit based on async_awake cydia 分支的代码比较新 KNelectra 打开app 自动激活 //todo 定制一些项目的需求: 比如创建初始化一些基本设置 async_awake 存放cydia 预留源地址的目录 ioast:/private/etc/apt/sources.list.d roo...…</p>
<div class="post-list__meta"><time datetime="2018-02-28 00:00:00 +0000" class="post-list__meta--date date">2018-02-28</time> • <span class="post-list__meta--tags tags">iOSre</span><a class="btn-border-small" href=/2018/02/Electra/>继续阅读</a></div>
</div>
</section>
部分。
- 模板本身也是文档,所以一个模板也可以用layout变量指定使用一个模板作为布局,这就是模板的继承。
- 利用好Liquid语言的include语法能够带来很大的变量。被包含的页面部件需要放在_includes文件夹中
- 需要大量的js以增加动态特性,在设计模板时要遵循Unobtrusive JavaScript原则。https://christianheilmann.com/2007/11/12/the-seven-rules-of-unobtrusive-javascript/
2)灵活的导航
可以在_config.yml中设置一个导航菜单的变量:
menuitems:
- name: 首页
url: /index.html
- name: 分类
url: /categories.html
- name: 标签
url: /tags.html
- name: 归档
url: /archive.html
- name: 读书
url: /reading.html
- name: 工作
url: /working.html
- name: 关于
url: /about.html
<!-- 然后在模板的导航部分可以这样写: -->
<ul class="nav">
{% for item in site.menuitems %}
{% if item.url == page.url %}
<li class="active">
{% else %}
<li>
{% endif %}
<a href=""></a>
</li>
{% endfor %}
</ul>
# Navigation buttons in the front page.s
nav:
- {title: 所有文章, description: archive, url: '/archive'}
- {title: 标签, description: tags, url: '/tags'}
- {title: 关于我, description: about, url: '/about'}
3)分类、标签、归档和RSS
分类、标签和归档可以按照不同的方式检索博客文章;RSS可以订阅博客。---用Jekyll的变量和模板很容易实现这些元素。
- 注意:不管文件的扩展名是md、html还是xml、txt,只要文件的头部包含变量声明,Jekyll的模板引擎就会对其进行处理。
其中md和html文件都会处理为html,其他类型会保持扩展名。
4) 分页
浮动标题 on paginator
5) 语法高亮
- 利用外部资源,比如GitHub Gist---很重要,简单,但是需要使用外部链接或通过js嵌入到页面,不利于文档和代码的统一维护
- 使用js在前端渲染,比如google-code-prettify
简单高效,对语言的支持不够多
<link href="/js/google-code-prettify/prettify.css" rel="stylesheet">
<script src="/js/google-code-prettify/prettify.js"></script>
<script>
$(document).ready(function(){
prettyPrint();
});
</script>
- 使用Jekyll插件,比如调用pygments---GitHub 好像只支持插件
推荐方式。支持100多种语言。
<!-- 采用pygments的方式: -->
pip install pygments
1) 在_config.yml中设置
pygments: true
2)在代码的前后增加过滤器:
{/% highlight ruby linenos %/}
def foo
puts 'foo'
end
{/% endhighlight %/}
<!-- 博客搬家 -->
Jekyll提供了一个import的子命令(需要插件jekyll-import),可以将旧的博客导入到Jekyll
<!-- 三、推广篇 -->
- 社会化网络
通过混搭(marshup) 可以把各种各样第三方的功能部件(widgets)加到你的博客中
1) 社会化评论
国外的有disqus,国内的有友言,多说
2) 社会化推荐---其实使用/www.google.com/adsense 就有这种效果
国内的有友荐,无觅。
Jekyll本身也可以实现站内文章推荐的功能。
3) 社会化分享
国内的有加网 ,百度分享等。其中加网提供了划词分享功能。
4)社交网站
Twitter, Facebook, Google Plus, 新浪微博等网站。与博客的联动可以是自己发布博客动态
5)社会化登录
- 流量分析和统计
选择的有国外的Google Analysis、SiteMeter和国内的百度统计、
量子恒道统计等。
-- 文档目录(TODO) ---- 我觉得很重要 catalog: true
catalog-body
generateCatalog(".catalog-body");
<!-- 其实及时对标题的定位 -->
<!-- <a class="catalog-toggle" href="#">CATALOG</a> -->
catalog: true
https://github.com/qiubaiying/qiubaiying.github.io/search?utf8=%E2%9C%93&q=css%2Fhux-blog.css&type=
<!-- _includes/head.html -->
<!-- Custom CSS -->
<link rel="stylesheet" href="/css/hux-blog.min.css">
<!-- _includes/footer.html -->
<!-- Side Catalog -->
<!-- Custom Theme JavaScript -->
<script src="/js/hux-blog.min.js "></script>
<!-- less/hux-blog.less -->
@import "variables.less";
@import "mixins.less";
@import "sidebar.less";
@import "side-catalog.less";
<!-- less/side-catalog.less -->
<!-- js/hux-blog.js -->
var currentTop = $(window).scrollTop(),
$catalog = $('.side-catalog');
<!-- kn css/hux-blog.css-->
<!-- $ git clone <版本库的网址> <本地目录名> -->

$ git clone [user@]example.com:path/to/repo.git/

<!-- 二、git remote -->

<!-- 使用-v选项,可以参看远程主机的网址。 -->

devzkndeMacBook-Pro:electra devzkn$ git remote -v
origin  git@github.com:coolstar/electra.git (fetch)
origin  git@github.com:coolstar/electra.git (push)


<!-- 克隆版本库的时候,所使用的远程主机自动被Git命名为origin。如果想用其他的主机名,需要用git clone命令的-o选项指定。 -->

$ git clone -o jQuery https://github.com/jquery/jquery.git


<!-- git remote命令列出所有远程主机。 -->


<!-- git remote show命令加上主机名,可以查看该主机的详细信息。-->

devzkndeMacBook-Pro:electra devzkn$  git remote show origin
* remote origin
  Fetch URL: git@github.com:coolstar/electra.git
  Push  URL: git@github.com:coolstar/electra.git
  HEAD branch: master
  Remote branches:
    cydia  tracked
    master tracked
  Local branch configured for 'git pull':
    master merges with remote master
  Local ref configured for 'git push':
    master pushes to master (fast-forwardable)


<!-- git remote add命令用于添加远程主机。 -->

$ git remote add <主机名> <网址>


<!-- git remote rm命令用于删除远程主机。 -->

<!-- git remote rename命令用于远程主机的改名。 -->

<!-- 三、git fetch -->

$ git fetch <远程主机名>


<!-- 默认情况下,git fetch取回所有分支(branch)的更新。如果只想取回特定分支的更新,可以指定分支名。 -->

devzkndeMacBook-Pro:electra devzkn$ git fetch origin  cydia
From github.com:coolstar/electra
 * branch            cydia      -> FETCH_HEAD


devzkndeMacBook-Pro:electra devzkn$  git branch -r
  origin/HEAD -> origin/master
  origin/cydia
  origin/master


  <!-- 查看所有的分支 -->
devzkndeMacBook-Pro:electra devzkn$ git branch -a
* master
  remotes/origin/HEAD -> origin/master
  remotes/origin/cydia
  remotes/origin/master


<!-- 取回远程主机的更新以后,可以在它的基础上,使用git checkout命令创建一个新的分支。 -->
$ git checkout -b newBrach origin/master

devzkndeMacBook-Pro:electra devzkn$ git checkout -b cydia origin/cydia

devzkndeMacBook-Pro:electra devzkn$ git fetch origin


<!-- 此外,也可以使用git merge命令或者git rebase命令,在本地分支上合并远程分支。 -->

$ git merge origin/master
# 或者
$ git rebase origin/master

上面命令表示在当前分支上,合并origin/master。


<!-- 四、git pull -->

<!-- $ git pull <远程主机名> <远程分支名>:<本地分支名> -->

$ git pull origin next:master

<!-- Git也允许手动建立追踪关系。 -->

git branch --set-upstream master origin/next


如果当前分支与远程分支存在追踪关系,git pull就可以省略远程分支名。


<!-- git pull 加上参数 -p 就会在本地删除远程已经删除的分支。 -->


<!-- 总结: 取回远程的一个分支 cydia-->

devzkndeMacBook-Pro:electra devzkn$ git checkout -b cydia origin/cydia
Branch cydia set up to track remote branch cydia from origin.
Switched to a new branch 'cydia'

devzkndeMacBook-Pro:electra devzkn$ git fetch origin
- repo-auth
1、项目级公钥管理:到项目的管理页面,选择菜单中的“Deploy Keys”,即可设置项目级别公钥 - 使用 Jekyll 将 Markdown 撰写的文档编译为博客:采用 Disqus 的外部评论系统,就不会因迁移造成评论数据损失
devzkndeMacBook-Pro:zhangkn.github.io devzkn$ ping https://zhangkn.github.io PING sni.github.map.fastly.net (151.101.77.147): 56 data bytes 64 bytes from 151.101.77.147: icmp_seq=0 ttl=51 time=157.939 ms 64 bytes from 151.101.77.147: icmp_seq=1 ttl=51 time=157.864 ms -
缺陷追踪(Issue)也是GitHub工作流中一个重要的组件:Gitment:使用 GitHub Issues 搭建评论系统 https://github.com/imsun/gitment
- join-github/010-account-setup
1、将公钥文件中的内容粘贴到GitHub的SSH公钥管理的对话框中
<!-- 在~/.ssh目录下创建名为gotgithub的私钥和名为gotgithub.pub的公钥文件。 -->
$ ssh-keygen -C "gotgithub@gmail.com" -f ~/.ssh/gotgithub
<!-- 在~/.ssh/config配置文件中写入 公钥的配置信息 -->
Host github.com
  User git
  Hostname github.com
  PreferredAuthentications publickey
  IdentityFile ~/.ssh/gotgithub
<!-- 将~/.ssh/gotgithub.pub文件内容拷贝到剪切板:pbcopy命令[2]将文件内容拷贝到剪切板以避免拷贝错误 -->
$ cat ~/.ssh/gotgithub.pub | pbcopy
<!-- ssh命令后面添加-v参数加以诊断 -->
$ ssh -Tv git@github.com
2、Mac下的命令行工具pbcopy和pbpaste可以在命令行下操作剪贴板,Linux下的命令行工具xsel亦可实现类似功能。在Linux下可以创建别名用xsel命令来模拟pbcopy和pbpaste 。

alias pbcopy='xsel --input'
alias pbpaste='xsel --output'
- 创建新项目
<!-- 为版本库添加名为origin的远程版本库 --> $ git remote add origin git@github.com:gotgithub/helloworld.git <!-- 注意命令行中的-u参数,在推送成功后自动建立本地分支与远程版本库分支的追踪。 --> $ git push -u origin master <!-- 使用强制推送。 --> $ git push -f - repo-operation
<!-- GitHub上版本库的默认分支,就是将GitHub版本库的头指针HEAD指向了其他分支 -->
devzkndeMacBook-Pro:zhangkn.github.io devzkn$ git branch -r
  origin/HEAD -> origin/master
  origin/master
  origin/test
devzkndeMacBook-Pro:zhangkn.github.io devzkn$
<!-- 从git ls-remote命令看出头指针HEAD和引用refs/heads/master 指向同一个对象的哈希值。 -->
devzkndeMacBook-Pro:zhangkn.github.io devzkn$ git ls-remote
From https://github.com/zhangkn/zhangkn.github.io.git
4d6104714ba6c9305d4aec129131dc043b2268a5	HEAD
4d6104714ba6c9305d4aec129131dc043b2268a5	refs/heads/master
921d23cb81f1853692ffb868ea9a535869ded514	refs/heads/test

<!-- 删除分支:能删除当前工作分支 、禁止删除远程版本库的缺省分支 -->
$ git branch -D mybranch1
$ git push origin :mybranch1

<!-- 里程碑和分支一样也是以引用的形式存在的,保存在.git/refs/tags/路径下 -->
devzkndeMacBook-Pro:zhangkn.github.io devzkn$ ls -lrt .git/refs/remotes/origin
total 24
-rw-r--r--  1 devzkn  staff  32 Dec 11 23:35 HEAD
-rw-r--r--  1 devzkn  staff  41 Jan 26 17:51 test
-rw-r--r--  1 devzkn  staff  41 Mar  2 15:24 master
<!-- git tag <tagname> [<commit>] 命令创建 -->
$ git tag -m "Tag on initial commit" mytag1 HEAD^

<!-- 将本地里程碑推送到GitHub远程版本库。 -->
$ git push origin refs/tags/*
<!-- 删除本地里程碑 -->
$ git tag -d mytag3
<!-- 删除GitHub远程版本库中的里程碑 -->
$ git push origin :mytag3
在操作过程或者文章有问题的话欢迎在 原文 里提问或指正。